[안드로이드 스튜디오] 텍스트 자동 크기(AutoTextSize) 조절하기 (JAVA/자바)
안녕하세요~ 코딩하는 코알못 코메인입니다.
이번에는 텍스트 크기를 layout 크기에 맞춰 자동으로 변하게 해주는 AutoSize에대해 알아보겠다.
필자가 복리 계산기 앱을 만들면서 해상도 별 텍스트 크기를 맞추기 위해 해당 기능을 활용하였다.
해당 글에 사용법과 설명이 나와있다.
https://developer.android.com/guide/topics/ui/look-and-feel/autosizing-textview?hl=ko
TextView 자동 크기 조절 | Android 개발자 | Android Developers
TextView 자동 크기 조절 Android 8.0(API 수준 26) 이상을 사용하면 TextView의 특성 및 경계에 따라 텍스트 크기를 자동으로 확장하거나 축소하여 레이아웃을 채우도록 TextView에 지시할 수 있습니다. 이
developer.android.com
해당 글을 참고해도 좋다.
위 글 제목과 같이 대표적으로 TextView에서 활용 할 수 있지만, 필자가 직접 확인 해 본 바로는 EditText에서는 적용이 안되고, Button에서는 적용 되는 것을 확인했다.
사용 방법
해당 기능은 미리 설정된 크기를 사용하는 방법과 텍스트 크기의 범위를 정해줘서 해당 텍스트가 들어갈 TextView나 Button의 레이아웃 크기에 맞춰서 자동으로 적용 되는 방법이 있다.
첫번째 방법부터 보자.
우선 arrays.xml 파일을 res/values 해당 위치에 생성해 준다.
arrays.xml 파일에
<resources>
  <array name="autosize_text_sizes">
    <item>10sp</item>
    <item>12sp</item>
    <item>20sp</item>
    <item>40sp</item>
    <item>100sp</item>
  </array>
</resources>
해당 코드를 적어준다.<item>0sp</item>에서 0sp 부분에 텍스트 크기에 적용 할 원하는 크기를 입력하면 된다.
item의 개수는 꼭 5개가 아니여도 되니, 자신이 개발 할 앱에 맞게 크기를 정해서 입력하면 된다.
이제 이 파일을 main.xml 파일에 적용하면 된다. 그 부분은 하단에 코드란에서 확인 하자.
두번째 방법을 보자.
두번재 방법은 main.xml 파일에 입력하면 된다.
<TextView
      android:layout_width="match_parent"
      android:layout_height="200dp"
      app:autoSizeTextType="uniform"
      app:autoSizeMinTextSize="12sp"
      app:autoSizeMaxTextSize="100sp"
      app:autoSizeStepGranularity="2sp" />
auroSizeTextType 에는 "uniform"을 입력해준다. (선택에는 none과 uniform이 있는데, none을 선택하면 기본 값으로 적용(즉 자동 조정이 적용 안되는 것이다.) 되고, uniform을 입력 시 좌 우 크기가 칸에 맞춰서 적용 된다.)
autoSizeMinTextSize에는 텍스트 크기 범위에서 최솟값을 적어준다.
autoSizeMamTextSize에는 텍스트 크기 범위에서 최댓값을 적어준다.
autoSizeStepGranularity에는 텍스트 크기의 변화 폭이다. 예를 들어 현재 칸의 크기가 100이고, 현재 텍스트 크기가 100이며, Granularity의 크기는 1일 떄 칸의 크기가 1 줄어 99가 되면 텍스트 크기도 99가 되는 것이다. granularity가 2이면 칸의 크기가 99이면 텍스트 크기는 98이 되는 것이고, 칸의 크기가 101이면 텍스트 크기는 100이 되는 것이다. 증감 폭을 정하는 것이다. 그냥 봐서는 이해가 안될 수 있지만 직접 해보면 알게 될 것이다.
본 코드로 들어가 보자.
코드
첫번째 방법 xml코드
array.xml
<?xml version="1.0" encoding="utf-8"?>
<resources>
    <array name="autosize_text_sizes">
        <item>6sp</item>
        <item>10sp</item>
        <item>20sp</item>
        <item>50sp</item>
    </array>
</resources>
필자는 6, 10, 20, 50 으로 4가지만 지정해줬다.
메인 xml
<?xml version="1.0" encoding="utf-8"?>
<androidx.constraintlayout.widget.ConstraintLayout xmlns:android="http://schemas.android.com/apk/res/android"
    xmlns:app="http://schemas.android.com/apk/res-auto"
    xmlns:tools="http://schemas.android.com/tools"
    android:layout_width="match_parent"
    android:layout_height="match_parent"
    tools:context=".MainActivity">

    <TextView
        android:layout_width="400dp"
        android:layout_height="200dp"
        android:autoSizeTextType="uniform"
        android:autoSizePresetSizes="@array/autosize_text_sizes"
        app:layout_constraintBottom_toBottomOf="parent"
        app:layout_constraintLeft_toLeftOf="parent"
        app:layout_constraintRight_toRightOf="parent"
        app:layout_constraintTop_toTopOf="parent"
        app:layout_constraintVertical_bias="0.467" />

</androidx.constraintlayout.widget.ConstraintLayout>
android:autoSizeTextType="uniform"
android:autoSizePresetSizes="@array/autosize_text_sizes"
해당 값이 입력 된 것이다.
첫번째 방법 실행
변화의 차이를 알기 쉽게 입력 값의 변화로 보여주겠다.
딱봐도 크기가 팍팍 줄어드는 것이 보일 것이다. 이렇게 직접 크기의 단계를 정할 수 있다.
두번째 방법 xml코드
<?xml version="1.0" encoding="utf-8"?>
<androidx.constraintlayout.widget.ConstraintLayout xmlns:android="http://schemas.android.com/apk/res/android"
    xmlns:app="http://schemas.android.com/apk/res-auto"
    xmlns:tools="http://schemas.android.com/tools"
    android:layout_width="match_parent"
    android:layout_height="match_parent"
    tools:context=".MainActivity">

    <TextView
        android:id="@+id/TextView"
        android:layout_width="400dp"
        android:layout_height="200dp"
        android:background="@color/purple_500"
        android:textColor="@color/white"
        android:text="0"
        android:autoSizeTextType="uniform"
        android:autoSizeMaxTextSize="200sp"
        android:autoSizeMinTextSize="12sp"
        android:autoSizeStepGranularity="2sp"
        app:layout_constraintBottom_toBottomOf="parent"
        app:layout_constraintLeft_toLeftOf="parent"
        app:layout_constraintRight_toRightOf="parent"
        app:layout_constraintTop_toTopOf="parent"
        app:layout_constraintVertical_bias="0.467" />

</androidx.constraintlayout.widget.ConstraintLayout>
android:autoSizeTextType="uniform"
android:autoSizeMaxTextSize="200sp"
android:autoSizeMinTextSize="12sp"
android:autoSizeStepGranularity="2sp"
필자는 최대 200sp, 최소 12sp, 변화 크기 2sp로 설정했다.
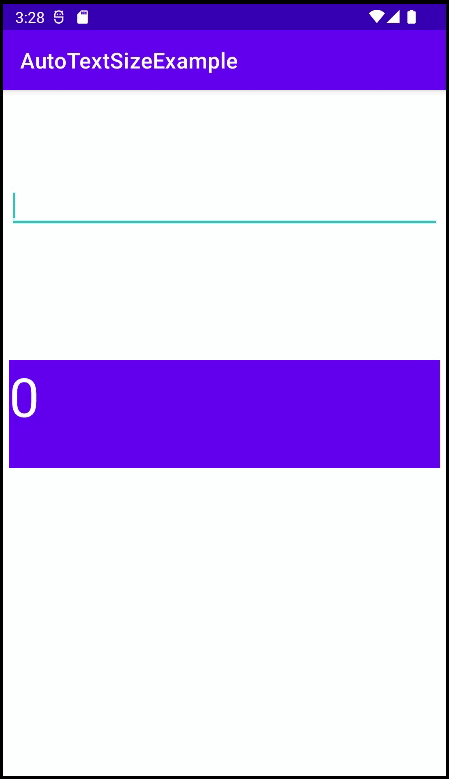
두번째 방법 실행
이것도 변화의 차이를 알기 쉽게 입력 값의 변화로 보여주겠다.
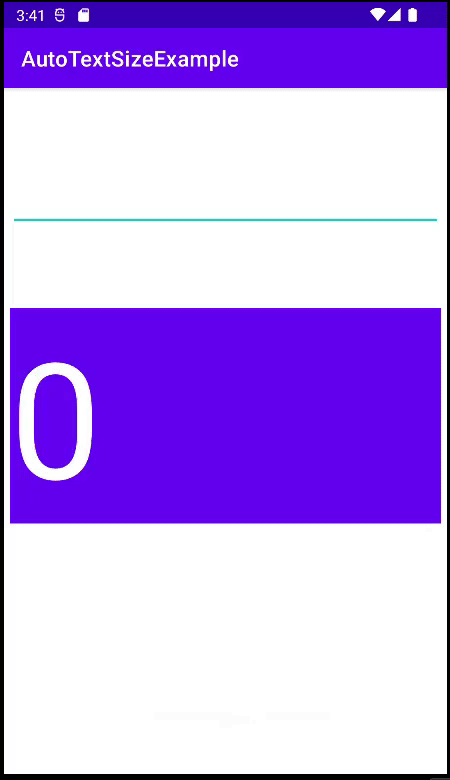
이건 최대 200sp부터 값이 레이아웃에 가득 차면 2sp씩 줄여가는 모습니다. 사실상 두번째 방법이 더 많이 쓰일 것 같다.
마지막으로 필자같은 경우엔 해당 기능을 제목이나, 명칭에 적용했다. 그리고 주의할 점을 하나 알았다.
값이 적용되는 레이아웃의 크기가 가로폭이 짧고 세로폭이 짧게 되면 크기가 줄지 않고 줄이 넘어가게 된다.
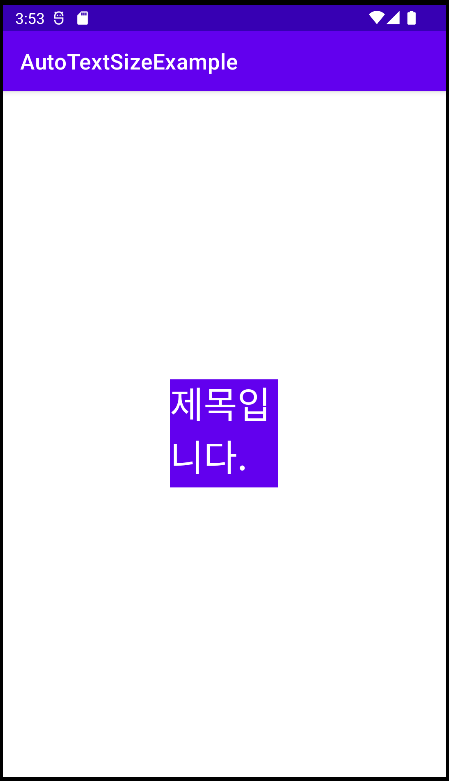
이런 식으로. 그래서 이렇게 제목이나 명칭에 사용해야하고, 한줄로 표시되게 하고 싶으면 꼭!
android:maxLines="1"을 xml파일에 적용하고 싶은 TextView나 Button에 적어 넣자. 그렇게 하면 이렇게
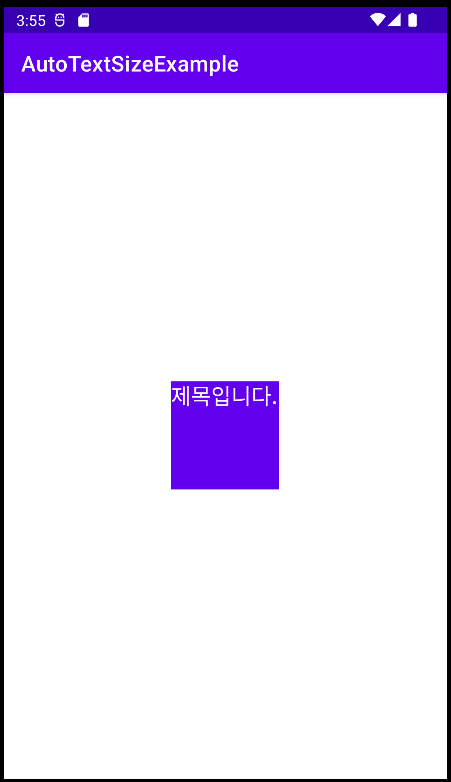
나오게 된다.
만약 보시고 틀린 점이나 추가로 정보를 주고 싶은 분이 있다면 거리낌 없이 댓글로 남겨주시면 감사히 새겨 듣겠습니다.
마지막으로 제가 직접 출시 한 복리계산기 앱 많은 이용 부탁드립니다.
복리계산기 게시글입니다.
https://comain.tistory.com/316
[복리 계산기] 앱 출시
안녕하세요~ 코딩하는 코알못 코메인입니다. 개인 프로젝트로 어플 만들기를 진행 했습니다. 제목에 적힌대로 만든 어플은 복리 계산기입니다. 주식, 펀드 등과 같은 투자, 은행 금리, 적금 이자
comain.tistory.com
복리 계산기 플레이스토어 주소입니다.
https://play.google.com/store/apps/details?id=com.comain.myapplication
복리 계산기 - Google Play 앱
주식, 펀드 등과 같은 투자에 관한 이득 금액을 예상 해 볼 수 있는 복리 계산기
play.google.com